Hacked Ikea VÄRDE freestanding cabinet with cherry butcherblock
Before
The Breakfast nook as we purchased it in 2006
Partly Finished
The breakfast nook in 2007 after receiving a fresh coat of paint, a small cafe table, and a bakers rack
The Finished Project
Updated Breakfast Nook
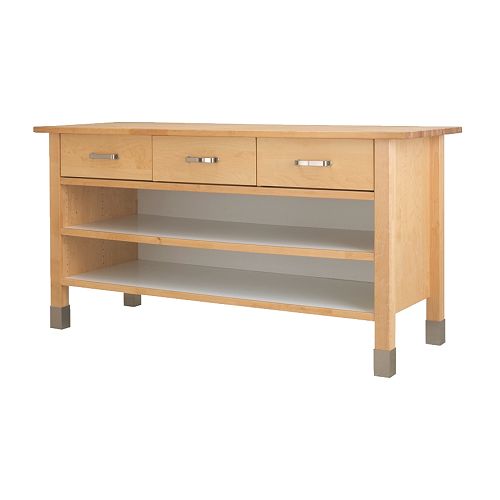
We purchased an Ikea freestanding VÄRDE Base cabinet for about $400.
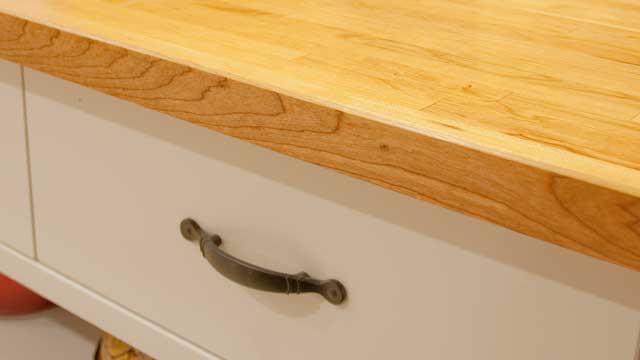
We repainted the VÄRDE cabinet white to match our cabinets and replaced the countertop to match our kitchen’s butcherblock. The butcherblock is manufactured by Williamsburg Butcher Block Co. (product: 1 1/2″ x 25″ x 8 lft American Cherry Butcher Block) and was purchased for about $300 from Lumber Liquidators. Lumber Liquidators offers butcherblock counters in 8′ and 12′ lengths in cherry, maple, white oak, and walnut. The slabs we purchased took a few weeks to arrive in Austin.
Ikea freestanding VÄRDE Base cabinet which was repainted and received a replacement cherry butcherblock top and drawer handles
Closeup detail of cherry butcherblock top showing camfer detail and replacement drawer handles
After cross-cutting the Lumber Liquidators butcher block slab to length, I spent a good bit of time filling small joint lines with wood filler and sanding the slabs. I also added a small camfer detail on the edges with a 45-degree router bit. I finished the counters with 3 coats of Waterlox Original Sealer/Finish and 1 coat of Waterlox Original Satin Finish. I allowed the finish to cure for 30 days before installing it on the base cabinet.
Wide shot of cherry butcherblock top showing camfer detail and replacement drawer handles
Ikea freestanding VÄRDE Base cabinet which was repainted and received a replacement cherry butcherblock top and drawer handles
Ikea freestanding VÄRDE Base cabinet which was repainted and received a replacement cherry butcherblock top and drawer handles
Big Brother is Watching You – Obey the Pug
Total cost for the Hacked Ikea VÄRDE freestanding cabinet with cherry butcherblock was approximately $850 (cabinet, butcher block, handles, paint, waterlox).


What was your process and supplies for repainting this cabinet? I am looking to buy this as a stand for two large pet cages (its dimensions are perfect), but the birch will not match anything else in my home. Did you have to sand it? Do you think the stock counter top would be stainable? Any advice is appreciated!
@shannon, I used a random-orbital sander like this one (Porter-Cable 382 5-Inch Random Orbit Sander) to sand the entire cabinet using 150 and 220 grit sandpaper.
After sanding, I wiped the cabinet down with mineral spirits on a rag to get all the dust off. Then, I sprayed it outside on the driveway using an HVLP sprayer like this one (Wagner 518080 Control Spray Max HVLP Sprayer). I used regular water-based latex paint which I thinned with some water per the sprayer’s directions. If you didn’t want to spray it, you could brush paint the cabinet, but the finish when you use the sprayer just looks awesome b/c its so smooth.
I did all this sanding and spraying with the top and drawers removed. I sprayed the drawers separately from the cabinet. Be sure to remove the drawer runners as well so they don’t get covered in dust or paint.
Regarding the top, to my memory, the stock countertop was minimally finished as we got it from Ikea. I know that when we used the stock top, we treated it several times with ikea’s countertop finish which is probably the same thing as salad-bowl oil. Though I didn’t try it, I would guess that yes, you absolutely could sand the countertop a bit using the sander referenced above (I would start with 120 grit then move to 150 and finally 220. I’m a huge fan of Mirka sanding disks. They last longer and are substantially cheaper than the ones you can find at the big box stores. Here’s a multipack which has several different grits. The velcro on the back makes them a breeze to change out.Mirka 23-615-AP Gold 5-Inch 8-Hole Dustless Hook-and-Loop Sanding Disks, 10 Each of 5 Grits
Once you’ve sanded it, a rubbing stain and then spray poly should put a great looking finish on it which could stand up to some abuse from pet cages.
David, how did you remove the stainless decorative bits on the legs? LOVE what you did with this piece, very inspirational
Sarah, the stainless bits on the legs are just square sleeves which slid onto the wooden leg. We simply didn’t reinstall them
Hello
This looks fabulous!
I am in the UK and have just bought a house which has two Ikea varde units as its kitchen (this being one if them)
I LOVE what you have done to this!
I read through your process of how to do this, but do you undercoat (prime) the unit before you spray painted it and also how many coats did you spray it with?
I am not great at DIY, but this is what I want my units to look like.
Shelly, took the cabinet outside on the driveway, set it on a tarp, and I used a HPLV sprayer to prime & paint the cabinet. My sprayer is from a discount importer here in the US called Harbor Freight Tools. I’m sure you can find something similar overseas. Here’s the product: http://www.harborfreight.com/high-volume-low-pressure-spray-gun-kit-44677.html
I sanded the cabinet with an electric palm sander using grits starting at 120 and working up to 240 grit. Then I wiped the cabinet down with a wet rag followed by cheesecloth to get off all the dust.
Finally, I sprayed 2 light coats of Kilz water-based primer. http://www.kilz.com/primer/v/index.jsp?vgnextoid=ef4c693378683210VgnVCM1000006b0910acRCRD. Once that had dried, I sprayed the latex paint. I believe it was “eggshell” finish. In all, I probably put on about 4 light coats. They dry very quickly so the whole process with primer & paint only takes an afternoon.
I really like what you did with the cabinet. I would like to know if you sanded and painted the shelves as well.
Tatiana, yes, I sanded & painted the shelves just like the rest of the unit. Note that the unit as you buy it from Ikea has white melamine shelves trimmed with wood on the front. I simply painted over everything.
Hi, I know this is an older post but your kitchen layout seems to be exactly like mine. I’m new to this home and am having a hard time trying to decorate this layout. Would you mind posting a picture of the kitchen itself. maybe I can get a better grasp on what I could do. Btw love the island I think I may follow suit.
Mali, here’s a few other pictures of the kitchen:
https://davidcox.smugmug.com/Friends/Windrush-House/i-dRSdJXB/A
https://davidcox.smugmug.com/Friends/Windrush-House/i-CvGpszK/A
https://davidcox.smugmug.com/Friends/Windrush-House/i-L8hVCSP/A
https://davidcox.smugmug.com/Friends/Windrush-House/i-JTkZhfJ/A
https://davidcox.smugmug.com/Friends/Windrush-House/i-6JDPGkj/A
https://davidcox.smugmug.com/Friends/Windrush-House/i-zf3pjXm/A
https://davidcox.smugmug.com/Friends/Windrush-House/i-3twvvsH/A
https://davidcox.smugmug.com/Friends/Windrush-House/i-Pph5Gp7/A
https://davidcox.smugmug.com/Friends/Windrush-House/i-2PjVb4m/A
What color yellow is the kitchen painted? My cabinetry is similar and I can’t find a shade that coordinates as well as this.
Hi Natalie – we used Lowes Olympus Interior Eggshell Latex BC-2 Morning Sun
HI,
I have an old Varde unit like the one you have (not modified so nicely though). I cracked the middle shelf that is under the drawers. At the time – ikea did not sell any spare parts. Do you have any advice on either buying or making a replacement? Thanks!
Hi,
I have the original Varde unit too! I love the finished product of your project. Mines needs a facelift fast! Unfortunately, I’m having trouble
replacing all 3 of the top drawers being as thought the unit has been discontinued. I was wondering if you could give me some advice on
How or where to get replacement drawers thanks!
If Ikea can’t sell you a replacement drawer, I would think the only option would be to build one or reach out to a local woodoworker to do so.